Thursday 29 November 2012

Cupcake Mosaic


Our assignment was to create a mini cupcake mosaic! We worked with mini cupcakes of about 3 cm in width. We worked in pairs, I worked with my twin sister (she will also be posting this on her blog).
We had to design our "own" cupcake design, we were allowed to use a well know art work or make something unique. 
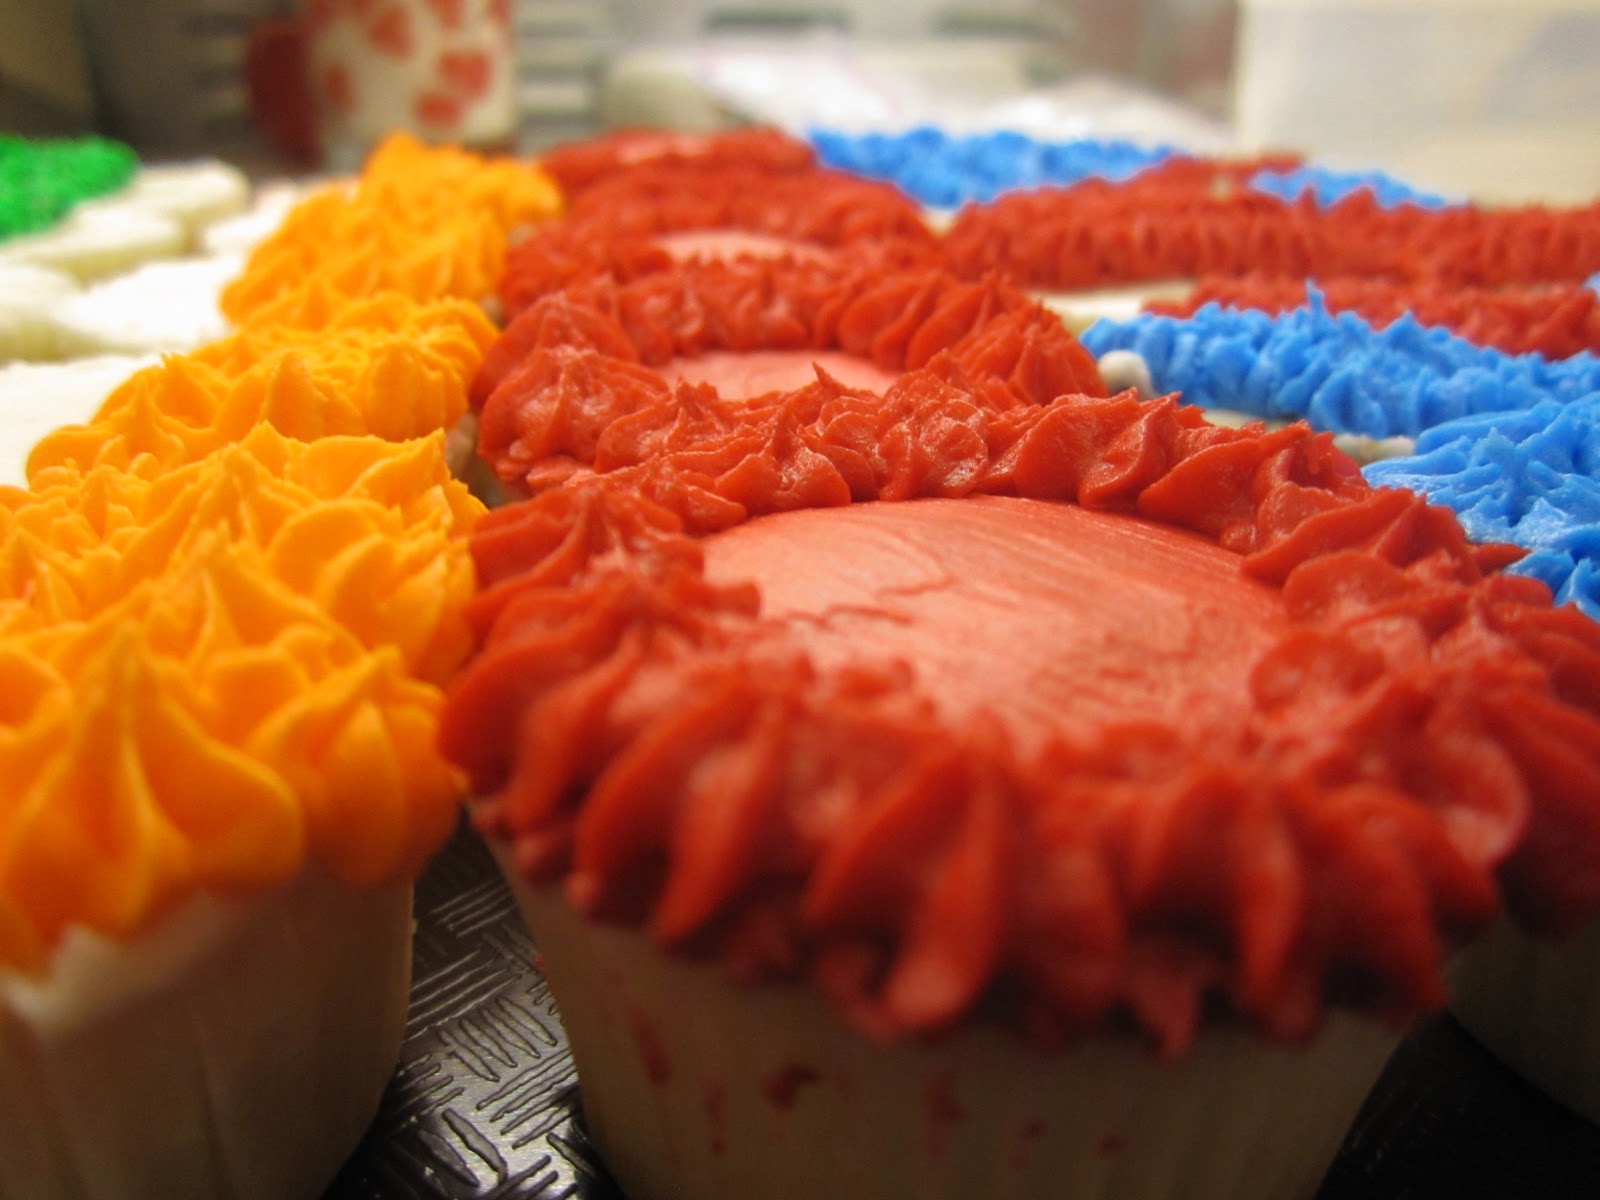
Finished Product

The recipe:

We used the yellow cupcake recipe for our cupcakes, which can be found here.
For our icing, we used the classic buttercream icing, which can be found here


Product:

Since Faith was being really lazy, very indecisive and not really helping at all! I had to  design our cupcake mosaic but she had to agree with it before we used it.

So since right now I am like obsessed with One Direction (linked in case you don't know about One Direction), not like my friends who practically screams about them every second, I'm more like a closet fan and only fangirl in private.

My other plans in case Faith didn't like my One Direction flag was a turtle, a owl or the UK (same as the Britian) flag.

This is design is in reference to One Direction, if you know them, you know that Niall is from Ireland and Zayn, Louis, Liam and Harry are from Britian so the "flag" is half the Ireland flag for Niall and Britian flag for the others. 

A lot of people didn't understand this mosaic when I showed it to them but lucky I had some fellow Directioners who understand. 


Plain before icing


Faith did the triangles...they look kind of weird


Gingerbread


For our food art class, our project for the past few weeks was making a gingerbread structure/building. It was to be part of our school Winter Village that will be displayed at the Hyatt Hotel for a month! Personally I don't really like making gingerbread, I could never tell when my dough is soft and workable!


Finished Product

The recipe:


Ingredients:  


  • 250 mL Shortening
  • 25o mL sugar
  • 2 eggs
  • 300 mL molasses
  • 15 mL vinegar
  • 1370 mL flour
  • 5 mL baking soda
  • 5 mL salt
  • 5 mL ground ginger
  • 5 mL ground cinnamon
  • 5 mL fround cloves

Method:
  1. Cream shortening well.
  2. Gradually add sugar and cream well again.
  3. Beat in eggs, molasses and vinegar.
  4. Stir together 250 mL of the flour along with baking soda, salt and spices.                                        
  5. Gradually blend the first cup of flour and spices into the creamed mixture and mix well.
  6. Add another 250 mL of the flour gradually, blending well.                                     You may find that at this point the dough is stiff enough and the reaming flour may make the dough too dry and crumbly. Your dough should feel soft and workable but not sticky. If you think it had gotten too dry and crumbly then re-crumble into a bowl and sprinkle with a little water and work until it comes together and is workable.
  7. Gather the dough into a ball then flatten it into a dish and wrap it tightly with plastic wrap and put in the fridge if you are baking on a different day.
  8. Roll out the dough to 3mm thickness  (check with a ruler)                                                          *It may be easier to shape large, cut-out pieces of gingerbread directly on the baking sheet or onto parchment paper, so that the dough doesn't distort as you transfer if from the work surface.
  9. Cut into shapes.
  10. Place 2.5 cm apart from each other on parchment lined cookie sheets or jelly roll pans.
  11. Bake at 375°F or 190°C for 5-6 minutes or until firm and lightly browned.                       *Like any cookie, gingerbread is not crisp or firm when it first comes out of the oven: this means it may be difficult to tell whether it is cookies, particularly as cooking times vary from oven to oven. Generally, the dough will have risen slightly and will be just colouring around the edges. Do not under cook.
  12. Cool slightly on the sheet for about 5 minutes, in which time it will start to crisp, and then remove to racks to cool completely.                                                *If the gingerbread still feels very soft, return it to the oven for a few minutes.
  13. Very often the gingerbread will distort slightly during baking. If you wish or feel the need to trim it to reshape (especially for the houses pieces to fit properly), be sure to do it while the dough is still warm. If you allow it to cool and then try to trim it, it could break.
To store:
Large, flat pieces of gingerbread must be cooled and stored on a flat surface or they will become distorted. Use a box or try to store and in a ziplock bag. 

Product:


In the Village

Village

Village


Monday 12 November 2012

Roasted Pumpkin Seeds

I totally forgot to put this with my owl pumpkin >.<
We decided to roast our pumpkin seeds that was in our pumpkins. We did two kinds, a spicy and a sweet one.

Spicy Pumpkin Seeds


The recipe (spicy):

Ingredients: 
  • 15 mL olive oil
  • salt
  • 1 mL Tabasco Sauce
  • 5 mL cayenne pepper
  • 1 mL cumin
  • 15 mL chili power
The recipe (sweet):

Ingredients: 
  • 15 mL olive oil
  • salt
  • 15 mL sugar
  • 1 mL cinnamon
  • dash of nutmeg
  • dash of allspice 
Method: 
  1. Preheat the oven to 350°F or 180°C.
  2. In a small bowl, toss together pumpkin seeds, olive oil, and all the spices; season with salt.
  3. Evenly spread pumpkin seeds on a baking sheet and transfer to the oven.
  4. Cook until toasted and fragrant, 10-12 minutes.
Product:
Spicy

Sweet

Sweet

Thursday 8 November 2012

Classic Buttercream Icing

This is the icing I used for the Yellow Cupcakes. 


Finished Product

The recipe (Classic Buttercream Icing):

Ingredients: 
  •  250 mL vegetable shortening (you can substitute with butter but makes sure you have the correct amount!)
  • 5 mL vanilla
  • 30 mL water
  • 454 g or 1000 mL icing sugar
  • 15 mL egg white powder
  • Food colouring
Method:
  1.  In a large bowl, cream shortening, icing sugar, egg white powder, vanilla and water.
  2.  Add the dry ingredients and mix on medium speed until all the ingredients has been thoroughly mixed together,
  3. Blend together for an additional minute until creamy.
  4. This icing can be refrigerated or you can freeze it. 
  5. For the piping of the icing, it depends on you. 
Product:


Cupcakes!

We made yellow cupcakes with classic buttercream icing for one of our classes! I found the icing a little too sweet for me but a lot of people really likes it. This post would be about the Yellow Cupcakes and I would post another on for the Classic Buttercream Icing.

Finished Product


The recipe (Yellow Cupcakes):

Ingredients:  
  •  375 mL cake flour shifted
  •  5 mL baking powder
  •  1 mL salt
  • 220 mL granulated sugar
  • 85 mL margarine
  • 1 egg
  • 5 mL vanilla extract 
  • 150 mL milk
Method:
  1. Preheat the oven to 350°F or 180°C.
  2. Line a muffin tin with paper liners.
  3. Sift together flour, baking powder and salt; set aside.
  4. Cream sugar and butter together until light.
  5. Add the egg and vanilla to creamed mixture and beat until thoroughly mixed. 
  6. Add flour mixture to creamed mixture alternately with milk, beating well after each addition. Continue beating for one minute but  be careful not to over mix!
  7. Scoop into the muffin tins. Bake for 18 - 20 minutes or until an inserted toothpick comes out clean
  8. Cool for 10 minutes in the muffin tins on the rack then remove and cool completely before decorating.
  9. You could freeze the cupcakes if you don't want to decorate them on the same day you bake them.
Product:


Spider Web Cookies


This is pretty late...should have posted this before Halloween but I keep forgetting >.<
Oh well! Better late then never!

Finished Product


The recipe (cookies):

Ingredients: 
  • 375 mL flour
  • 200 mL cocoa powder
  • 2 mL salt
  • 185 mL margarine
  • 300 mL icing sugar
  • 1 egg
  • 3 mL vanilla
Method: 

  1.  In a large bowl, sift together flour, cocoa, salt. Set the mixture aside.
  2. Use an electric mixer to cream the margarine and icing sugar until fluffy. Beat in the eggs and vanilla.
  3. Add the flour mixture; mix on low speed until thoroughly combined.
  4. Divide the dough in half; wrap in plastic wrap.
  5. Chill the dough for 10 minutes in the freezer.
  6. Heat oven to 350°F or 180°C
  7. Roll the dough out between two pieces of wax paper until about 5 mm thick.
  8. Cut out a tracer for the web shape from scale paper.
  9. Cut out each cookie.
  10. Place cookies on an ungreased cookie sheet and bake for 8-10 minutes (personally I couldn't really tell if it's ready or not because you can't tell by the colour)
  11. Cool completely on wire racks.  

The recipe (Royal Icing):

Ingredients:
  •  250 grams sugar
  •  2 mL cream of tartar
  • 15 mL whip powder
  •  50 mL water 
  • black food colouring/ 30 mL chocolate chips/ black icing paste
Method:
  1. Whip together the ingredients in a medium bowl
  2. To make the cobweb design, begin by icing the cookie with white royal icing. 
  3. To 50 mL of the icing add 30 mL of melted chocolate chips or black food colouring or use black icing paste. 
  4. Pipe out a spiral of black icing starting from the center to the edges of the cookies  
  5. Draw a bamboo skewer or use the tips of a sharp knife and drag it from the center to each point of the cookie, then from the inner curves back to the center.
Product:

The spiderweb tracers we cutted out
Cutting out the web

Before we bake

Before we put it in the oven


Finished baking!

icing

Finished!


Some of them looks a little weird >.<