.jpg) |
| Finished Product |
The recipe:
Ingredients:
Basic Carmel Software:
- 500 mL sugar
- 250 mL water
- 1 tablespoon light corn syrup
Caramel Sauce Software:
- 1 batch caramel (above)
- 500 mL heavy cream
Banana Brulee Software:
- 4 bananas
- sugar for coating
Additional: ICE CREAM
Method:
- Combine the sugar, water, and corn syrup in a small, heavy saucepan and place over high heat.As soon as the sugar dissolved, heat your thermometer under warm tap water (to prevent thermal shock) and attach to the side of your pot, making sure that the bulb is completely submerged but doesn't touch the bottom of the pot. DO NOT STIR THE MIXTURE OR AGITATE THE PAN AT THIS STAGE!
- When the mixture reached 230°F (110°C), reduce the heat to medium and allow the sugar to colour gradually. As the temperature approached 300°F (150°C) the colour will start to turn amber. At this point, it's safe to swirl the pan gently to help distribute the heat evenly. As the caramel heads towards 340°F (170°C), it will reach a deep amber colour.
- Remove the pan from the heat and slowly stir with a metal spoon, allowing it to cool until the caramel falls from the spoon in a solid stream, like a string (keep stirring and lifting up the spoon). When it does, it's doodad time!
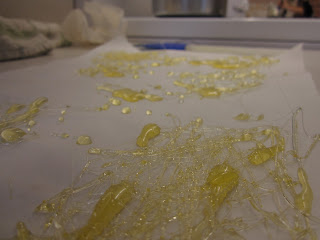
- Form the doodads by holding the spoon 12 to 16 inches over with caramel and drizzling a pattern on the parchment. The thinner it fall from the spoon the better (Hint: allow the spoon to unload into the pan for a few seconds before attempting the doodads. This will allow a narrower stream).
- Quick back and forth motions or side to side movements are the best (I personally like to make circles). It's all in the wrist. Allow the doodads to cool for 15 minutes then peel the paper off (not the other way around, you might break it). Stack in an airtight container with wax paper between in each pieces if you are not using it.
- After making 15 to 20 doodads, you should have sufficient caramel reaming to move on to the sauce phase.
- Return the remaining caramel to medium high heat and continue cooking until you dee the first sign of smoke (in the pot not the element!) Immediately remove from the heat, and add the cream all at once, at arms length (it will boil furiously). Once the mixture calms down, return to medium heat and boil for 3 minutes more, stirring occasionally. Cool to room temperature and then move to squirt bottle (or just into a glass bowl and cover with plastic wrap) and refrigerate for up to a week.
- To make the banana brulee, quarter the bananas (peel on) and then remove the peel and put sugar (we put a lot) on the flat part of the banana and place on cooling racks over several players of foil. (Don't try to do this on you dining room table). Don you safety goggles and fire up your torch (you don't actually need goggles). Hold the torch so that the very tip of the flame barely touches the banana, and move quickly back and forth until the sugar melts, turns brown, and bubbles. As soon as it looks like caramel (the top of a crème brulee), move on. You know you've got it down when a solid, glass like sheet of gold (no graininess) has formed on the banana.
- To do the split (so to speak), squirt a pattern of caramel sauce on a chilled plate top with 4 banana pieces (Lincoln log style), top with ice cream of your choice and finally, a doodad. But you can do it any style you want if you don't want to do the log one.
Product:
I keep forgetting to bring my camera to class >.< (had to charge it last night and forgot to put back the battery so I brought a camera with no battery) so yet again I had to use my iPhone camera which not only was crappy but in the middle of taking pictures it shut down on me when it still had 100% and refused to open again for the whole day until I plugged it in a charger! So I was only able to take few. I asked if someone (ie. one of my group mates that wasn't my sister) if she could take some pictures for me and send it to me but she refused which was pretty mean especially when she took pictures off my blog without asking me! Sorry for that little rant there but it was making me angry.


.JPG)
.JPG)
.JPG)
Overall the product tasted really good (except the ice cream), my group really liked the caramel sauce, they were putting in everywhere! The doodads were kind of spiky when we ate it...it hurts when it when down our throat.
I keep forgetting to bring my camera to class >.< (had to charge it last night and forgot to put back the battery so I brought a camera with no battery) so yet again I had to use my iPhone camera which not only was crappy but in the middle of taking pictures it shut down on me when it still had 100% and refused to open again for the whole day until I plugged it in a charger! So I was only able to take few. I asked if someone (ie. one of my group mates that wasn't my sister) if she could take some pictures for me and send it to me but she refused which was pretty mean especially when she took pictures off my blog without asking me! Sorry for that little rant there but it was making me angry.
Sorry for the really bad pictures
 |
| heating the sugar |
 |
| we didn't get an amber colour for our doodads >.< |
 |
| Caramel sauce when we added the heavy cream (bubbling) |
 |
| Our first attempts but we got better! |


.JPG) |
| We actually put more sugar on it but it dissolved but we put more in the end |
.JPG)
.JPG) |
| Bananas we torched |
.JPG) |
| close up, you want an amber colour |
.JPG) |
| the plate that I decorated |
.JPG) |
| my finished product! it was good though the ice cream was kind of bad, it was all chunky |
.JPG) |
| tried to use this new app on my phone |
.JPG)
.JPG)


